

Thursday, November 28, 2013
Tuesday, November 5, 2013
Nuts About You
A couple weeks ago, I posted a color challenge. The task was to use these colors...

...as part of a project (a card, layout, home decor - anything!).
Today I'm here to share my take on the challenge:

I started with the October kit from Simon Says Stamp:

The colors in this kit were a perfect match for the challenge; the difficult part was choosing which stamp I wanted to use!
After more deliberation than I'd care to admit, I chose the squirrel stamp with the "nuts about you" sentiment. I stamped the squirrel onto a 2.75" by 5.5" piece of cardstock (can you tell my boys sometimes use my ink pads?):

I then die cut around the squirrel (the die I used actually cuts two nesting circles, which allowed for the "border" around my circle):

I then stamped the sentiment:

Next, I cut and scored the cardstock base for the card(it's just a standard A2):

I cut down a piece of patterned paper to 3.25" by 5.5" and adhered it to the card base. I used pop dots to adhere the white panel:

Finally, I added a couple sequins and put some glossy accents on top of the squirrel:

The pop dots I used under the circle are a smidge lower than the ones under the main panel; I wanted to give the card a bit more visual dimension.
And one more time, here's the finished product:

Oh, one last thing...I added a wee acorn to the inside of the card. I like the way it ties the inside of the card to the front:

Thursday, October 31, 2013
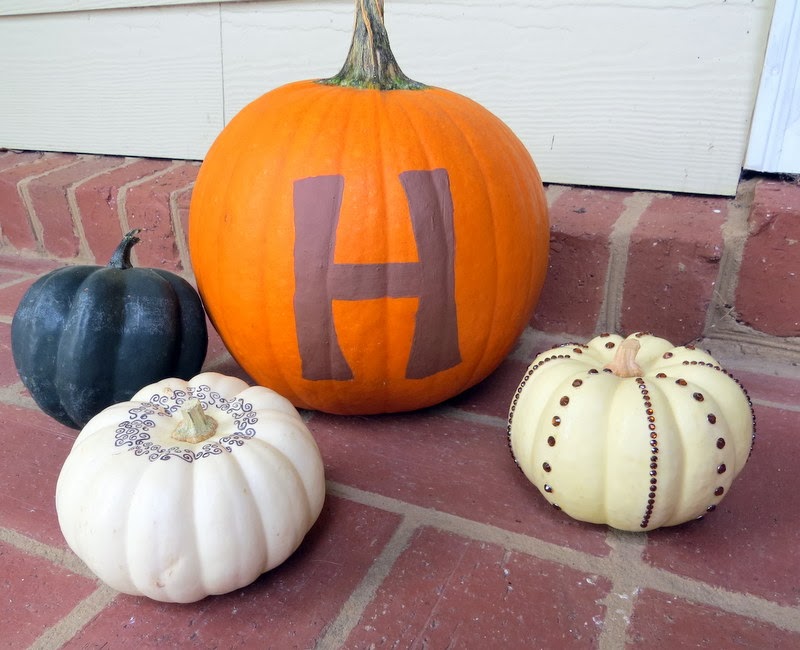
Happy Halloween!
Dawn here with a quick post - I'm sharing a couple last-minute Halloween decorations with y'all today.


...inspired by these monogram pumpkins.
I also pulled out the bling to make this guy...

...inspired by these sequined pumpkins.
I don't carve my pumpkins anymore (I leave that to my husband and boys) because I like to leave them out until Thanksgiving. The little ones will come in the house, but I'll probably leave the big guy out on our front porch. They make me smile.

That's it for me today. I'm off to make a last-minute run to the grocery store before the big night tonight (can you ever have enough candy?).
How about you? Do you have any last-minute fall decorations to share?
Since the arrival of pumpkin season makes my heart happy, I've been decorating a few - inspired by pinterest!
First, I painted this pumpkin...

I also pulled out the bling to make this guy...

...inspired by these sequined pumpkins.
I don't carve my pumpkins anymore (I leave that to my husband and boys) because I like to leave them out until Thanksgiving. The little ones will come in the house, but I'll probably leave the big guy out on our front porch. They make me smile.
To celebrate the holiday, I also created this little guy:

I'm not much of a digital scrapbooker, but I love creating graphics and home decor prints. For this piece, I used Lori Whitlock's Fall Fling Paper and Elements(how adorable is the pumpkin with the heart inside?!?).
My personal version is scaled at 8x10 so I can frame it. I am one of those people who change out my frames for the season (I stock up on the Virserum series by Ikea)...my husband just shakes his head.
That's it for me today. I'm off to make a last-minute run to the grocery store before the big night tonight (can you ever have enough candy?).
How about you? Do you have any last-minute fall decorations to share?
Tuesday, October 22, 2013
October Color Challenge
While I love winters in south Georgia, I really miss the autumns from up in Pennsylvania. I miss the cool, crisp air, and the beautiful colors of leaves on the trees. Today's post is inspired by those falling leaves.
I want to issue a color challenge inspired by those Octobers in Pennsylvania.

The blue you don't see so much in nature, but I liked the contrast it provided to some of the other colors. (By the way, all these colors are from Sherwin-Williams. I'm not affiliated with them in any way...I've just been visiting their site lately as I ponder whether to paint my foyer/great room/craft room in Pottery Barn's Cupola Yellow.)
Tuesday, October 15, 2013
Paper-Pieced Pumpkin
If you've read this blog for a while, you know that I am just a little bit in love with fall, so I have another fall home decor project for you.

To create this little guy, all you need are a couple sheets of patterned paper, some baker's twine, and adhesive. For added dimension, I inked the edges of the paper and embossed them, but those steps are completely optional.
A few notes:
I used extra-thick foam dots for the middle piece of the pumpkin to raise it just a smidge higher than the two sides.
I adhered the baker's twine with glossy accents. Click here for a video I created on how-to make the loops.
Here's a close-up pic:

Please share if you make one of these pumpkins - I'd love to see your creations!
Tuesday, September 24, 2013
Cousins
Hello Nesters! Dawn here, with a quick page walkthrough. As a little background...this summer my cousin and her two boys were able to come down for a visit - and I have a ton of pictures from that week waiting to be scrapped. With the start of the school-year, and vacation, and the never-ending cold that we keep passing around our family, I've been having a hard time fitting in time to sit down and scrap. (Anyone else like me? It always seems that my crafty time gets pushed to the back-burner when life gets crazy.)
My husband finally told me to sit down and work on a page - the chores will wait. (I really do love that guy!) I happened to have the September "We Are Family" kit from Scraptastic Club sitting on my desk, so that's what I used for this page.

This is actually the kit + add-on (you can see the full contents at the website if you're interested).

I pulled out a couple photos (to be honest, I just grabbed these from the top of the stack) and then selected any paper from the kit that I thought may work (I ended up only using three sheets though).
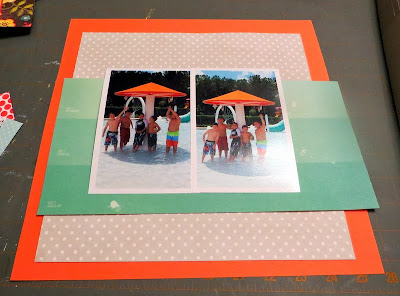
I narrowed my photos down to two. I don't often scrap a landscape and portrait photo on the same page, so I chose the two portrait photos and returned the landscape to the pile.
I also started playing with paper placement. I usually spend a few minutes moving my patterned paper around before I glue anything down.

Once I was satisfied with my paper placement, I inked my edges and starting adhering the paper to my layout. I added pennants from the die-cut sheet to both sides of my photos and then put a strip of washi tape along the tops of the pennants.

Here is the page with the title and a few stickers added. I wanted to keep this one simple, so I just added some enamel dots to finish things off:

It was really nice to sit down and finish a page. Now, I just need to motivate myself to complete the three other half-done projects sitting on my desk! :)
Tuesday, September 17, 2013
What I Did on Vacation
Do y'all remember having to write those paragraphs back in grade school?
Last week (and the week before last), my family took a much-needed vacation. Since I've been sorting through hundreds of photos to send to Snapfish, I thought I'd share a few pics from our trip.
First, we visited Main Street...


And my husband got cozy with this goofy guy:

My boys had lunch with some of the gang from the Hundred Acre Wood...


We got to see fireworks over a castle:

We even went on a safari to meet up with this fella:

It really is the most magical place on earth!

*True story: while walking through Fantasyland, a cast member approached me and asked if we had time for a story. We stopped, and she told us that Winnie-the-Pooh went looking for honey, but he found something else, and that he'd like to share his find with us. She then handed me 5 spoons wrapped in napkins. A second cast member then walked over with this giant sundae and told us it was a gift from Pooh. We love you Winnie-the-Pooh!
Last week (and the week before last), my family took a much-needed vacation. Since I've been sorting through hundreds of photos to send to Snapfish, I thought I'd share a few pics from our trip.
First, we visited Main Street...

Then we met up with these characters...

And my husband got cozy with this goofy guy:

My boys had lunch with some of the gang from the Hundred Acre Wood...


That last guy liked us so much, he even gave us some dessert*:

We got to see fireworks over a castle:

We even went on a safari to meet up with this fella:

It really is the most magical place on earth!

*True story: while walking through Fantasyland, a cast member approached me and asked if we had time for a story. We stopped, and she told us that Winnie-the-Pooh went looking for honey, but he found something else, and that he'd like to share his find with us. She then handed me 5 spoons wrapped in napkins. A second cast member then walked over with this giant sundae and told us it was a gift from Pooh. We love you Winnie-the-Pooh!
Tuesday, September 3, 2013
Paper-piecing, Paint, and Pumpkins!
Last week I mentioned how much I love autumn. Well, today I'm back with more!

I started with this adorable stamp from Unity, some more paper from the Witch Hazel line, and watercolor paint (along with a couple Copic markers and StazOn ink in jet black):

I stamped my image a couple times on each sheet:

Initially, I wasn't sure if I wanted to use the music note paper as an accent; after stamping once on that page, I knew it was going to be too busy for this piece.
I chose one of the ledger stamped images as my background and trimmed around it. I then colored in the fence, grass, and pumpkin stems with watercolor ink:

Next, I cut a ghost from a second stamped image on the ledger paper; I cut the pumpkins and patches for the ghost out of the orange print:

I adhered the patches to the ghost with liquid adhesive and then adhered the ghost and pumpkins to the background with pop-dots:


Because I really wanted my image to pop, I adhered the background paper on top of the glass:

To finish it off, I pulled out the pop-dots and attached the image + sentiment to the background:

And it's done! Maybe it's me, but that little ghost just makes me smile. :)

I started with this adorable stamp from Unity, some more paper from the Witch Hazel line, and watercolor paint (along with a couple Copic markers and StazOn ink in jet black):

I stamped my image a couple times on each sheet:

Initially, I wasn't sure if I wanted to use the music note paper as an accent; after stamping once on that page, I knew it was going to be too busy for this piece.
I chose one of the ledger stamped images as my background and trimmed around it. I then colored in the fence, grass, and pumpkin stems with watercolor ink:

Next, I cut a ghost from a second stamped image on the ledger paper; I cut the pumpkins and patches for the ghost out of the orange print:

I adhered the patches to the ghost with liquid adhesive and then adhered the ghost and pumpkins to the background with pop-dots:

I used the Copic marker (in toner gray T3) to outline the background image and used the colorless blender to soften the lines. Next, I stamped the sentiment on the same ledger paper and trimmed that. Both pieces needed a little something to define the edges, so I took an edge distresser (circa 2006?) to scruff them up a bit.

Because I really wanted my image to pop, I adhered the background paper on top of the glass:

To finish it off, I pulled out the pop-dots and attached the image + sentiment to the background:

And it's done! Maybe it's me, but that little ghost just makes me smile. :)
Thursday, August 29, 2013
Bewitched with Witch Hazel
Last year, October Afternoon released an adorable Halloween line, Witch Hazel.Now, Hazel has been patiently waiting for me to start my fall/halloween 2013 decorating. And since fall is my favorite season (even though we don't experience much of it in south Georgia), I decided that late August is a perfect time to start pulling out the pumpkins (and witches, in Hazel's case).
Here's what I came up with:


I chose a neutral paper and cut it down to fit the 5x7 opening in my Target (clearance!) frame. I then lined the paper up with the grid on my desk and used a ruler to keep the letters straight:
After adhering the letters, they were getting a bit lost in the paper, so I outlined them in black:


Because I'm crazy indecisive, I don't have pictures of the next step, but basically I spent 15 minutes moving around a couple stickers and pieces of chipboard until I was happy with the arrangement. To add a bit more dimension, I added some Liquid Glass to the "31", owl's eyes, and jack-o-lanterns:


Has anyone else started their fall crafting yet? Or pulled out the fall candles? Or experiencing cooler temps? If you've got a "yes" on that last one, could you send them down south for me? :)
Here's what I came up with:

This is already sitting on the table in my foyer. The pumpkin candles and soaps that have been in rotation for two weeks already (Bath & Body Works is my friend). Now, if only the weather would cooperate (90+ degree days are so last season!).
But back to Hazel...this is what I started with:

I chose a neutral paper and cut it down to fit the 5x7 opening in my Target (clearance!) frame. I then lined the paper up with the grid on my desk and used a ruler to keep the letters straight:

After adhering the letters, they were getting a bit lost in the paper, so I outlined them in black:

Next up was Hazel. I chose this oversized chipboard piece and attached it directly to the frame. I then added a couple jack-o-lanterns with pop dots (they were stickers, but I wanted them to have the extra dimension):

Because I'm crazy indecisive, I don't have pictures of the next step, but basically I spent 15 minutes moving around a couple stickers and pieces of chipboard until I was happy with the arrangement. To add a bit more dimension, I added some Liquid Glass to the "31", owl's eyes, and jack-o-lanterns:


And, once again, here is the completed project:

Subscribe to:
Posts
(
Atom
)
